
In this tutorial, we will provide a basic guide on how to establish a malware analysis lab. It is important to note that there are various approaches to setting up a lab, and the specific requirements may differ depending on the objectives of your analysis. We will present the steps in a clear and concise manner, with explanations provided along the way.
Requirements
To set up this lab, the following items are required:
- VirtualBox (https://www.virtualbox.org/)
- REMnux VM (https://remnux.org/#distro)
- Win10 VM (https://developer.microsoft.com/en-us/windows/downloads/virtual-machines/)
- ParrotOS VM (https://www.parrotsec.org/virtual/)
- enough RAM for running at least REMnux and one of the other VMs
ISO files may also be used instead of OVA files, but they require additional steps and take longer to set up.
Setup overview
The network setup we aim to achieve is as shown in diagram:
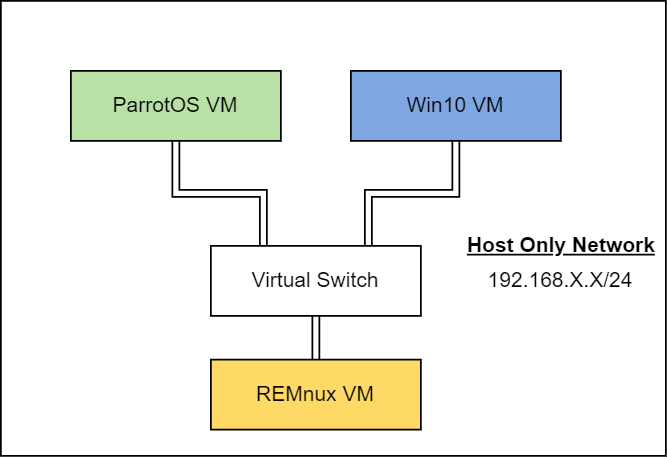
To isolate the network, we will only allow communication between the VMs. It is recommended that you take a snapshot of each VM before starting the setup, particularly for the Windows VM, which expires in 30 days.
Snapshots are like save files in video games; they can be loaded in case you make a mistake.
Setting up Virtual Machines - Tools
Initially, keep the network adapter on the machines as NAT since we’ll need to retrieve packages and download software.
REMnux
The REMnux is a virtual machine based on Ubuntu, developed by Lenny Zeltser, and includes various malware analysis tools such as Wireshark, Ghidra, and more.
Typically, it should function without any issues. However, if you encounter an error message that says “Oh no! Something went wrong,” I recommend trying the following:
1
sudo apt-get update && sudo apt-get dist-upgrade remnux upgrade reboot
Win10
The installation of the following tools is recommended:
- Process hacker
- procdot
- Process Monitor (ProcMon)
- IDA Free
- Ghidra
- Windbg / x64dbg
- PEstudio
- Common File Format Explorer
- Wireshark
- Autoruns
- Python3
- Sysinternal tools: strings, procdump, head, tail, grep.
- HxD
You may want to consider installing additional tools based on your specific use case. FireEye’s Flare VM (https://www.mandiant.com/resources/flare-vm-update) also provides a comprehensive suite of analysis tools that you can install. Remember to take a snapshot after installing the tools to avoid the need to reinstall them if you have to roll back to the initial snapshot.”
ParrotOS
ParrotOS is bundled with a wide range of pentesting tools, which may fulfill your requirements without the need for extensive tool installation (depending on your specific use case).
Setting up Virtual Machines - Network
After installing the tools, shut down all three VMs and change their network adapters from NAT to Host-only. Make sure to verify that the host network in VirtualBox’s Host Network Manager is correctly set up. Enabling the DHCP server could speed up the setup process, otherwise, you’ll have to manually enter each machine’s IP in their corresponding network settings.
Now you can power up the VMs. It’s not necessary to run both ParrotOS and Win10 at the same time, you can run one of them along with REMnux.
REMnux
After starting the VM, open a terminal and enter the “ifconfig” command to display the machine’s IP address. Note down this IP address, which will be used as the gateway and DNS server on the other machines. For example, in my case, the IP address was 192.168.103.4.
Win10
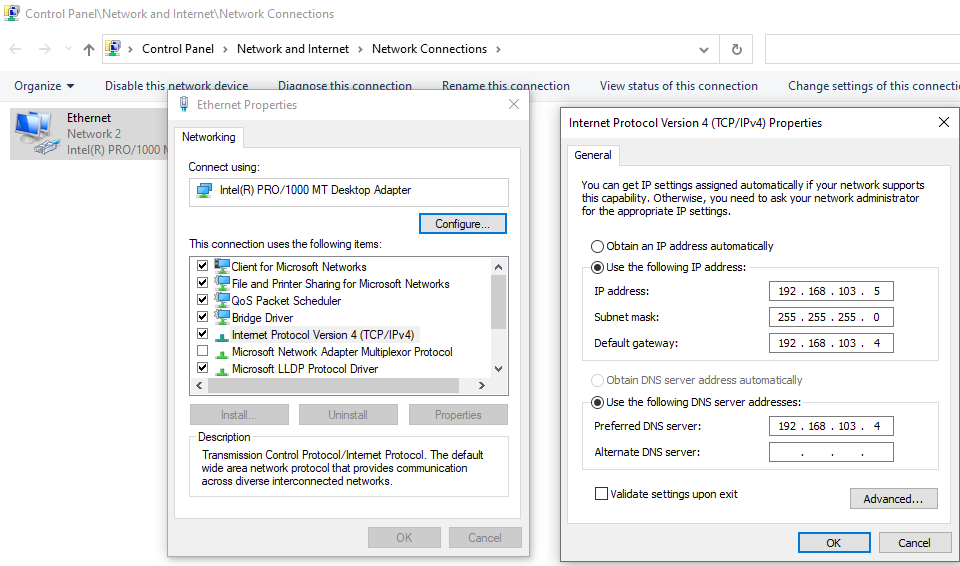
To modify the network adapter in Windows, navigate to Control Panel, then to Network and Internet, and select Network Sharing Center. From there, click on Change adapter settings and locate Ethernet. Right-click on it and select Properties. In the Properties window, choose Internet Protocol Version 4 (TCP/IPv4) and click Properties. Next, select the radio button labeled “Use the following IP address” and assign a valid IP address within the Host-only network range. For example, 192.168.103.5. Enter the REMnux IP as the default gateway and DNS server, and click OK to save the changes.
Verify the settings by running “ipconfig /all” in the command prompt. You should see the information you previously entered. Additionally, you should be able to ping the REMnux machine at this point:
1
2
3
4
5
6
7
8
9
10
11
12
C:\Users\jdoe>ping 192.168.103.4

Pinging 192.168.103.4 with 32 bytes of data:
Reply from 192.168.103.4: bytes=32 time=1ms TTL=64
Reply from 192.168.103.4: bytes=32 time=1ms TTL=64

Ping statistics for 192.168.103.4:
    Packets: Sent = 2, Received = 2, Lost = 0 (0% loss),
Approximate round trip times in milli-seconds:
    Minimum = 1ms, Maximum = 1ms, Average = 1ms
Control-C
^C
To enable pinging from the REMnux VM to the Win10 VM, you will have to disable the firewall by following these steps: Control Panel -> System and Security -> Windows Defender Firewall -> Turn Windows Defender Firewall on or off -> Select the option to turn it off for both private and public networks.
ParrotOS
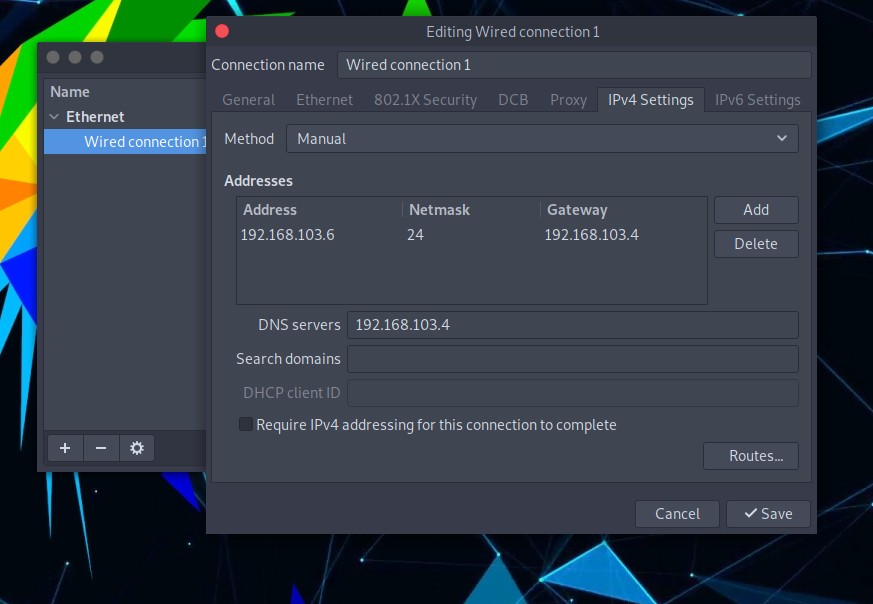
To configure the network settings on ParrotOS, go to System -> Preferences -> Internet and Network -> Advanced Network Configuration and click on the gear icon. Then, select the IPv4 Settings tab and choose Manual as the method.
Next, manually enter a valid IP address (such as 192.168.103.6) with a subnet mask of 24 and set the gateway to the REMnux IP. Remember to also set the DNS server to the REMnux IP.
Lastly, disconnect from Wired Connection 1 and reconnect to apply the new network settings.
Congratulations, you have completed the network setup. The ParrotOS and REMnux VMs are now able to communicate with each other by pinging.
Conclusion
What comes next? Obtain a malware sample and begin analyzing it on your VMs. Always run malware samples in an isolated environment on your virtual machines. REMnux has the capability to respond to a VM with “accept-all-ips start enp0s3,” which is useful if malware attempts to test for a connection. Additionally, you may want to perform static analysis before attempting to execute any code.